
DIY
DIY Elegance: Creating Beautiful Handmade Beeswax Candles

Handmade crafts have always had a unique charm, and when it comes to creating ambiance in a space, nothing beats the soft, natural glow of beeswax candles. Handmade beeswax candle tutorials are gaining popularity, with more and more people seeking to add a personal touch to their homes or give meaningful, handmade gifts to loved ones. In this article, we dive deep into the world of beeswax candles, offering a comprehensive guide to crafting these elegant, eco-friendly illuminations.
Introduction to Beeswax Candles
Beeswax candles have been cherished for centuries, valued for their natural composition, prolonged burning time, and the subtle, honey-like scent they emit. Unlike paraffin candles, which can release toxins when burned, beeswax candles are clean-burning, making them an excellent choice for health-conscious individuals.
Why Choose Beeswax?
- Natural and Non-toxic: Beeswax is a natural substance produced by bees. It doesn’t contain harmful chemicals, ensuring a clean burn.
- Longer Burning Time: Beeswax candles last longer than other types, offering more value for money.
- Aroma: The natural scent of beeswax candles is soothing and can even help in purifying the air.
Essential Materials for Crafting Beeswax Candles
- Beeswax: It’s best to use natural, unbleached beeswax for a beautiful golden hue.
- Wick: Opt for cotton or wood wicks.
- Melting Pot: For melting and pouring beeswax.
- Thermometer: To monitor the beeswax temperature.
- Molds or Containers: Depending on your desired candle shape.
Step-by-Step Handmade Beeswax Candle Tutorial
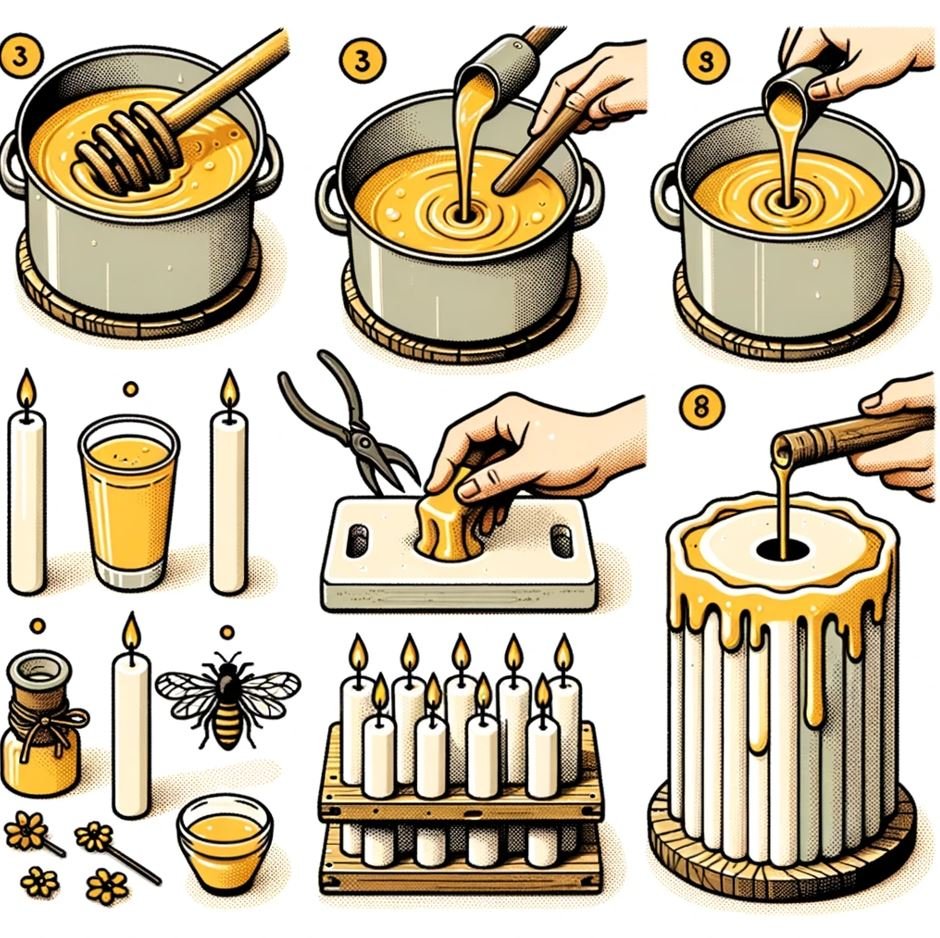
- Prepare Your Workspace: Lay down newspaper or wax paper to protect surfaces.
- Melting the Beeswax: In a melting pot, gently melt the beeswax. Use a thermometer to ensure it doesn’t exceed 185°F.
- Prepping the Wick: Dip the wick in the melted beeswax and then place it in the center of your mold or container.
- Pouring the Wax: Once the beeswax is melted and free of any lumps, carefully pour it into your mold.
- Setting: Allow the candle to set for several hours, preferably overnight.
- Unmolding and Trimming: Once set, remove the candle from the mold and trim the wick to about 1/4 inch.
| Do’s | Don’ts |
|---|---|
| Use natural, unbleached beeswax. | Don’t rush the cooling process. |
| Always monitor the melting temperature. | Avoid using scented oils not meant for candles. |
| Ensure wicks are centered. | Don’t leave hot wax unattended. |

Tips for Perfecting Your Candle-making Skills
- Experiment with Shapes: Try different molds or containers for unique candle shapes.
- Add Essential Oils: For added fragrance, consider using essential oils like lavender or eucalyptus.
- Color Your Candles: Use natural dyes or crayon shavings for a splash of color.
- Practice Makes Perfect: Like all crafts, the more you practice, the better you’ll become!
Conclusion
Handmade beeswax candles are not just a craft; they’re a reflection of art, patience, and dedication. Whether you’re making them for personal use, gifting, or even starting a small business, the process is rewarding. With the help of comprehensive handmade beeswax candle tutorials and continuous practice, you’ll soon master the art, of creating beautiful, illuminating pieces that bring warmth and elegance to any space.
Note: Always exercise caution when working with hot wax and open flames. Ensure your workspace is safe and free from flammable materials.


2 Simple Reasons Why a Load-Bearing Soil Test is Essential

5 Common Reasons Why It Pays to Have a Professional Plumber Install Your Appliances

3 Factors that Highlight Why Movable Walls are a Must-Have in Every Australian Art Gallery

4 Expert Pointers to Consider Before You Install Skylights

Kolin Jones Net Worth 2026: Age, Career, Business, and Wealth
-

 Home Improvement2 months ago
Why One Thermostat Can’t Keep The Whole House Comfortable?
-

 Beauty2 months ago
Understanding the Investment in Hair Treatments
-

 Health2 months ago
Fish Oil Pills Benefits for Brain Function and Mental Focus
-

 Home Improvement2 months ago
Why Your AC Runs All Day but Your House Still Feels Hot